

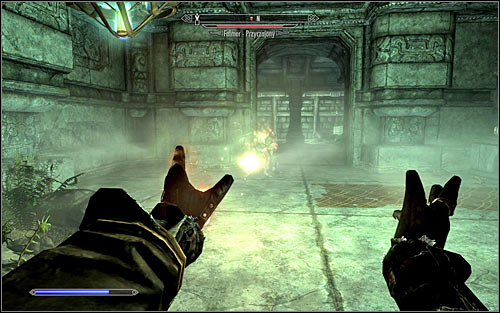
Once you’ve explored the area enough, head into the eastern corridor. Be on the lookout for the Chaurus that you’ll come across on your way. Due to the darkness, you might not notice it at first. As you get to the northern part of the caves, be careful, as you’ll be attacked by a few enemies at once. The Falmer Gloomlurker (shown in the screenshot above) is the strongest enemy here. Try to block its ice spells and increase your resistance against that element. Don’t let it get too close to you, as it has a powerful magical weapon. Use AoE spells during this battle, as the enemies are gathered on a relatively small area.
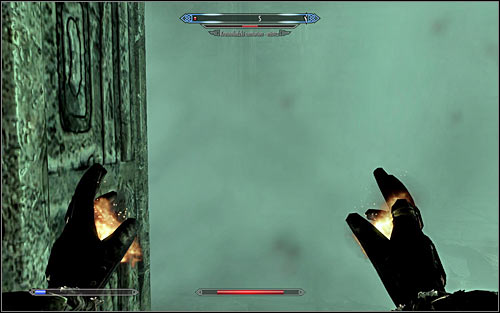
You can move onwards, walking beside the cleared Falmer camp. The second camp you come across should be empty and you’ll only come across a single Chaurus to the north from here. You’ll soon get out of the caves and return to the room resembling dwarven ruins. Be ready to deal with more Falmers (as shown in the screenshot above). After the battle, try opening the master-locked door to a small room to find a couple of rare items – Mzulft Room Key and The Lunar Lorkhan skillbook, which boosts your Alteration.

Follow the northern passage and then turn west. On your way, you’ll come across another locked door, which you can either lockpick or use the key you found in the storage room before. Be on the lookout for the Chaurus and search the area for treasures and a locked chest. Go further west, eventually reaching a much bigger room (as shown in the screenshot above).

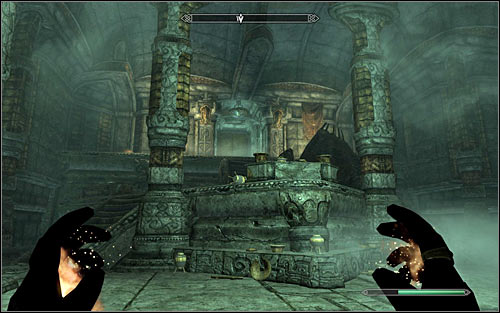
Be careful, as there will be two Falmers to eliminate here, including one capable of casting spells. After dealing with them, explore the area. The most interesting place is the room located in the south-west corner. It’s guarded by a Chaurus Reaper, but it also contains a chest with a few very precious items. To continue your mission, approach the big western door (as shown in the screenshot above). Examine the corpse of another Synod researcher and head through the door leading to Mzulft Aedrome.

Head east and deal with the first group of monsters, consisting of a Chaurus and Falmer. Turn north and save the game on your way. Soon enough, you’ll reach the biggest room of the ruins so far and you’ll be in for quite a hard fight. Start off by attacking the weaker Falmers, though sooner or later, you’ll come across their leader – the Falmer Shadowmaster (as shown in the screenshot above). Remember to try and block his spells and be on the lookout for his weapon.

After eliminating the Shadowmaster, deal with the other Falmers and return to its corpse. Take the Focusing Crystal, as it will come in handy later on. Explore the room thoroughly (the northern door has a master lock and one of the researcher’s bodies inside). Note that you’re temporarily unable to use the western gate, so choose the corridor going east (as shown in the screenshot above).

Enter the empty room without being attacked and reach the next room where you will find dead Falmers. Save your game before preparing for the toughest fight with the Dwarven Centurion Master in the neighboring room.
The Centurion’s basic attack involves releasing hot steam that reduces your health quickly. However, you can dodge it by strafing quickly when you see the boss preparing to attack.

It is advisable to attack the Centurion from the previous room, as it won’t be able to fit through the door. Keep in mind that it may take some time to drain all of its health, especially since it is resistant to magic.

After defeating the Centurion, search for a chest containing the Mzulft Observatory Key. You could try sneaking past the boss, but it is recommended to attack it from a distance.
With the key, return to the main room and head to the ignored big western gate. Open it using the key and go west towards the new door. Wait for Paratus Decimius to open it.
New main objective: Find the Focusing Crystal

Talk to Paratus Decimius, the only living Synod researcher, and he will tell you that you need the Focusing Crystal to solve the ruins’ mystery. If you already have it, you can move to the next step. Otherwise, find the corpse of the Falmer Shadowmaster in the previous room and take the Focusing Crystal.
New main objective: Return the Crystal to Paratus

Return to Paratus and give him the Focusing Crystal. He will allow you to accompany him on the further journey.
New main objective: Follow Paratus

Follow Paratus and cross the room with the large Oculory. He will explain his plan to switch one of the elements of the dwarven construction with the Focusing Crystal. Listen to his short instruction regarding what you need to do when you reach the destination.
New main objective: Place the Crystal into the Oculory

Mount the Crystal on the astrolabe in the middle part of the Oculory. Solve the puzzle by following the instructions in this guide to avoid any problems.
FAQ
1. What is Revealing the Unseen?
Revealing the Unseen is a quest in the game Skyrim that is part of the College of Winterhold questline. It involves exploring the Dwemer ruins of Mzulft in order to retrieve an ancient artifact known as the Synod’s “Oculory.” This quest is considered one of the more challenging quests in the game due to the complex puzzles and traps within the ruins.
2. How do I start the Revealing the Unseen quest?
In order to start the Revealing the Unseen quest, you must first complete the College of Winterhold questline up to the quest “Good Intentions.” Once you have completed “Good Intentions,” the Arch-Mage will give you the quest “Revealing the Unseen.”
3. What is the Synod’s “Oculory”?
The Synod’s “Oculory” is an ancient Dwemer device that was used to observe the stars and study the magical energies of the cosmos. The Synod, a group of mages who broke away from the College of Winterhold, believe that the Oculory holds the key to unlocking powerful magical secrets. The player is tasked with retrieving the Oculory from the ruins of Mzulft and bringing it back to the College.
4. What are some tips for completing Revealing the Unseen?
Some tips for completing the Revealing the Unseen quest include bringing plenty of lockpicks to deal with the numerous locked doors within the ruins, bringing a follower to help in combat, and using a combination of magic and melee attacks to deal with the Dwemer constructs that inhabit the ruins. It’s also important to pay close attention to clues and hints within the ruins, as they can help you solve the complex puzzles that stand in your way.
5. What rewards can I expect from completing Revealing the Unseen?
Completing the Revealing the Unseen quest will reward the player with a significant amount of gold and experience points, as well as access to the powerful spell “Detect Life.” Additionally, completing the quest will advance the player’s progress in the College of Winterhold questline, bringing them one step closer to becoming the Arch-Mage.

James, a young and enthusiastic gamer. With a passion for gaming, he personally plays and experiences the games he writes about, providing authentic and insightful content to fellow gamers.